
How to Use AdsPower with Puppeteer: Full Setup Guide
Take a Quick Look
Learn how to connect AdsPower anti-detect browser with Puppeteer for safer multi-account automation, scraping, and testing. Step-by-step setup and code examples.
🔥 Limited-Time Offer! Save extra 10% off on your first monthly plan with code: Anitdetect10
Sign upHow to Use AdsPower with Puppeteer
AdsPower and Puppeteer solve different halves of the same automation problem. AdsPower gives you isolated browser profiles with unique digital fingerprints, while Puppeteer gives you a programmatic way to drive those profiles. Together, they let you automate multi-account workflows, scraping jobs, and testing routines without looking like a bot.
This guide walks through the full setup: how the Local API works, how to launch a profile, how to connect Puppeteer to it, and how to avoid the common mistakes that break the connection.
Why Combine AdsPower and Puppeteer?
How to Use AdsPower with Puppeteer: Full Setup Guide - Why Combine AdsPower and Puppeteer?.
Puppeteer alone is powerful but easy to detect. A default headless Chrome instance exposes automation signals through its fingerprint, headers, and behavior. Websites that run anti-bot checks can flag it quickly.
AdsPower changes the equation. Each profile runs in an isolated environment with its own Canvas, WebGL, user agent, timezone, language, and other fingerprint parameters. When you connect Puppeteer to an AdsPower profile, your automation inherits that realistic fingerprint instead of a stock browser signature.
This combination is useful for:
- Managing multiple e-commerce seller accounts without cross-account linking
- Scraping sites that block headless browsers or datacenter IPs
- Running automated social media actions across separate profiles
- Testing web apps under different geographic and device conditions
- Affiliate marketing workflows that require distinct browser identities
For a broader comparison of anti-detect browser options, see our top 10 anti-detect browser products tested in 2026.
Prerequisites

How to Use AdsPower with Puppeteer: Full Setup Guide - Prerequisites.
Before you start, make sure you have:
- AdsPower installed on Windows, Mac, or Linux
- A paid AdsPower plan — Local API access requires a paid subscription
- Node.js installed, version 16 or newer
- Puppeteer installed in your project:
npm install puppeteer
Understanding the AdsPower Local API
AdsPower exposes a Local API that runs on your machine. The default endpoint is:
http://local.adspower.net:50325/
You can also use http://localhost:50325/. If the address ever changes, read the local_api file that AdsPower generates:
- MacOS: inside the application support directory
- Linux:
~/.config/adspower_global/cwd_global/source/local_api
All API calls accept query parameters as strings and return JSON. When security verification is enabled, include an authorization header:
Authorization: Bearer your_api_key
Step 1: Create a Browser Profile
How to Use AdsPower with Puppeteer: Full Setup Guide - Step 1: Create a Browser Profile.
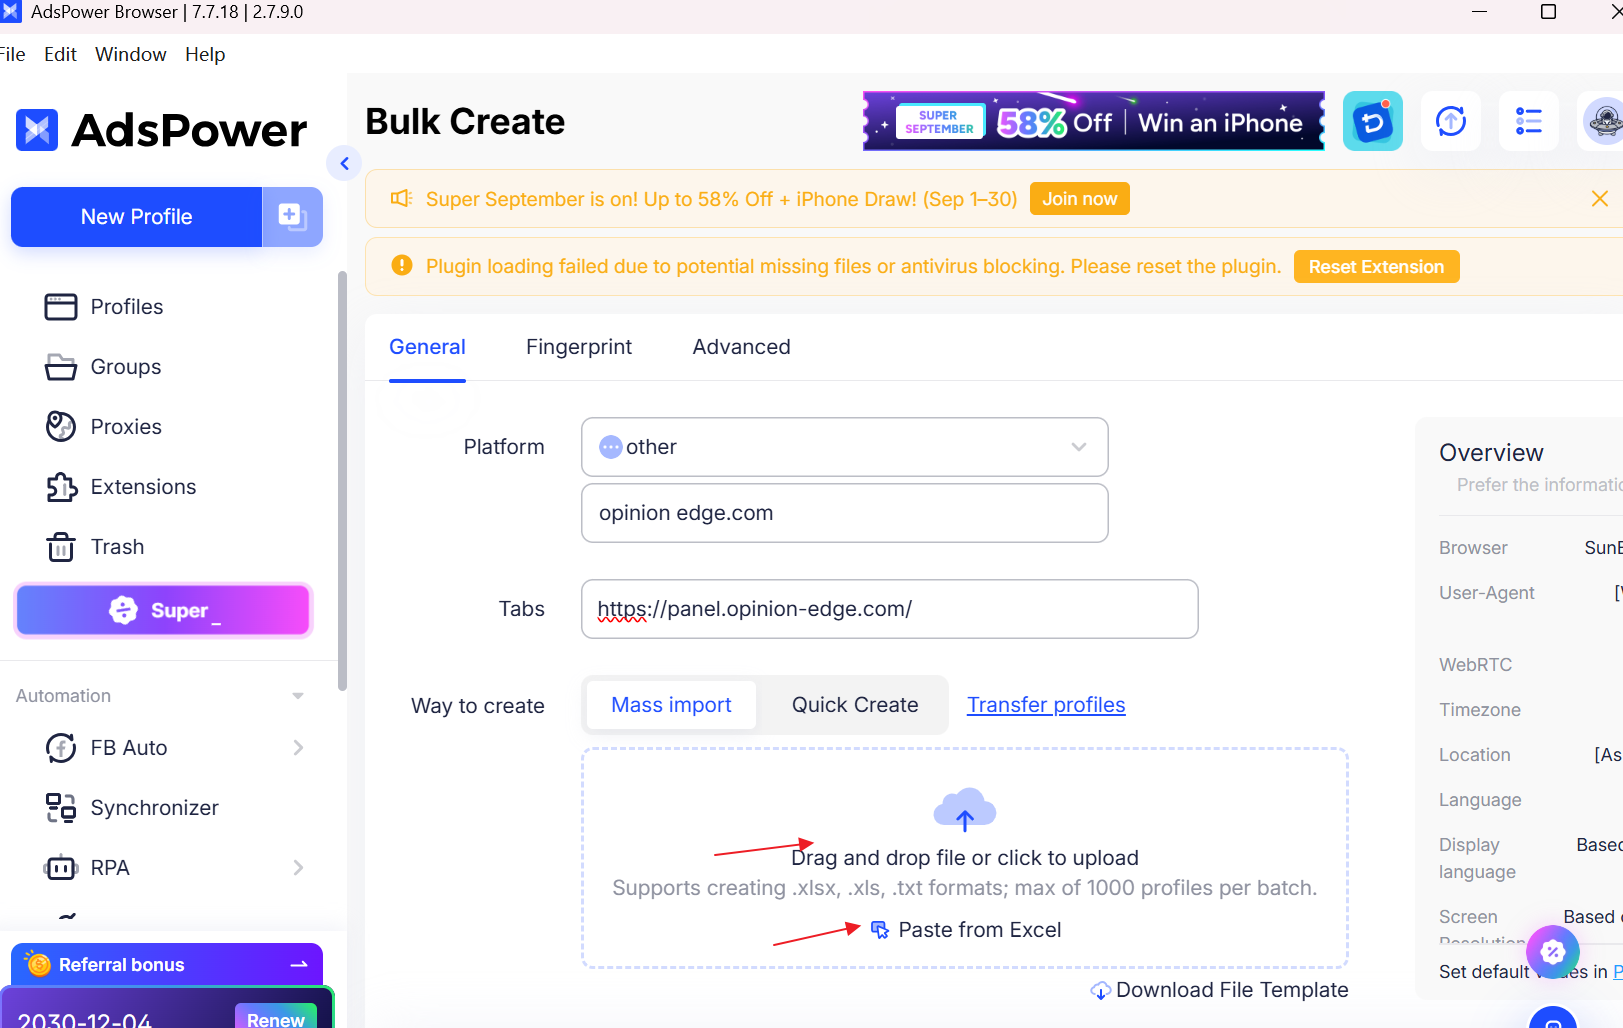
Open the AdsPower desktop app and create a new profile. Give it a name, choose an operating system, and optionally assign a proxy. The profile's user_id is what you will use in every API call.
You can find the user_id in the profile list or by calling the profile query endpoint. Keep it handy.
Step 2: Launch the Profile via Local API
The core endpoint for Puppeteer integration is /api/v1/browser/start. It launches a profile and returns the WebSocket debug address that Puppeteer needs.
Here is a minimal Node.js example using the built-in fetch:
const API_BASE = 'http://local.adspower.net:50325';

async function startBrowser(userId) {
  const url = `${API_BASE}/api/v1/browser/start?user_id=${userId}`;
  const response = await fetch(url);
  const result = await response.json();

  if (result.code !== 0) {
    throw new Error(`Failed to start browser: ${result.msg}`);
  }

  return result.data;
}

const data = await startBrowser('your_profile_user_id');
console.log(data.ws.puppeteer); // ws://127.0.0.1:xxxx/devtools/browser/xxxxxx
The response contains a ws object with two debug endpoints:
ws.selenium— for Selenium automationws.puppeteer— for Puppeteer automation
Use the puppeteer value in the next step.
Step 3: Connect Puppeteer to the Running Profile
Instead of launching a fresh browser with puppeteer.launch(), use puppeteer.connect() to attach to the AdsPower profile that is already running:
import puppeteer from 'puppeteer';

const browser = await puppeteer.connect({
  browserWSEndpoint: data.ws.puppeteer,
  defaultViewport: null
});

const pages = await browser.pages();
const page = pages[0] || await browser.newPage();

await page.goto('https://example.com');
console.log(await page.title());
The key detail: browserWSEndpoint must be the exact ws.puppeteer string returned by the start API. Do not add or remove path segments.
Step 4: Run Automation on the Profile
Once connected, you can use the full Puppeteer API. Here is a practical example that opens a page, waits for a selector, and extracts text:
const page = await browser.newPage();

await page.goto('https://www.amazon.com', {
  waitUntil: 'domcontentloaded',
  timeout: 60000
});

await page.waitForSelector('#nav-logo-sprites', { timeout: 30000 });

const title = await page.title();
console.log(`Page title: ${title}`);
For scraping tasks, pair the profile with a residential proxy. AdsPower supports proxy assignment per profile, which masks your IP alongside the fingerprint. If you need proxy recommendations, our IPRoyal review covers residential, ISP, and datacenter options.
Step 5: Close the Browser and Clean Up
When your automation finishes, disconnect Puppeteer and close the AdsPower browser through the API:
await browser.disconnect();

const closeUrl = `${API_BASE}/api/v1/browser/stop?user_id=${userId}`;
await fetch(closeUrl);
Always close profiles you are not using. Idle profiles consume memory and may interfere with later automation runs.
Practical Example: Scraping with Multiple Profiles
A common use case is scraping the same site from several profiles to distribute request load. Here is a compact worker pattern:
const PROFILE_IDS = ['id_1', 'id_2', 'id_3'];

async function scrapeWithProfile(userId, targetUrl) {
  const data = await startBrowser(userId);
  const browser = await puppeteer.connect({
    browserWSEndpoint: data.ws.puppeteer,
    defaultViewport: null
  });

  const page = await browser.newPage();
  await page.goto(targetUrl, { waitUntil: 'networkidle2' });

  const result = await page.evaluate(() => {
    return document.querySelector('h1')?.innerText || 'No heading';
  });

  console.log(`Profile ${userId}: ${result}`);

  await browser.disconnect();
  await fetch(`${API_BASE}/api/v1/browser/stop?user_id=${userId}`);
}

for (const id of PROFILE_IDS) {
  await scrapeWithProfile(id, 'https://example.com');
}
Run profiles sequentially or use a queue with limited concurrency. Sending too many simultaneous requests from the same machine can still trigger rate limiting, even with unique fingerprints.
Useful API Parameters for Puppeteer Workflows
Several optional parameters on the start endpoint are worth knowing:
| Parameter | Default | Purpose |
|---|---|---|
headless |
0 | Set to 1 to launch the profile in headless mode |
launch_args |
- | Pass Chromium flags, such as disabling images or notifications |
clear_cache_after_closing |
0 | Set to 1 to delete cache when the browser closes |
ip_tab |
1 | Control whether the IP detection page opens |
open_tabs |
0 | Open or close saved tabs on launch |
Example with launch arguments:
const url = `${API_BASE}/api/v1/browser/start?user_id=${userId}` +
  `&launch_args=["--disable-notifications","--blink-settings=imagesEnabled=false"]`;
Disabling images can speed up scraping significantly when visual content is not needed.
Common Issues and Fixes
Connection refused on localhost:50325
Make sure AdsPower is running and that you have a paid plan. The Local API is not available on free accounts. Check the local_api file if the port has changed.
Puppeteer connects but pages are empty
Call browser.pages() after connecting. AdsPower may open a default tab, but if none exists, create one with browser.newPage().
The profile opens but automation cannot find elements
Use realistic wait strategies. Prefer waitForSelector with explicit timeouts over fixed sleep calls. If the site is slow, increase the timeout.
Headless mode gets detected
Some sites fingerprint headless Chrome more aggressively. If you hit CAPTCHAs in headless mode, run the profile in headed mode (headless=0) or use a stronger proxy setup.
AdsPower + Puppeteer vs. Other Automation Approaches
| Approach | Fingerprint control | Multi-account safety | Setup complexity |
|---|---|---|---|
| Plain Puppeteer | Low | None | Low |
| Puppeteer + stealth plugins | Medium | None | Medium |
| AdsPower + Puppeteer | High | High | Medium |
| AdsPower RPA | High | High | Low |
If you need simple, no-code automation inside AdsPower, the built-in RPA tool may be enough. But when you need custom logic, conditional flows, or integration with your own Node.js code, the Puppeteer route is far more flexible.
For multi-store e-commerce setups, the same pattern applies. See our guide on using AdsPower with Ecwid for multi-store management for a concrete workflow.
Related reading
- AdsPower vs Octo Browser vs BitBrowser: 2026 Tested - Compare AdsPower, Octo Browser, and BitBrowser on fingerprinting, automation, pricing, free tiers, and ideal use cases to pick the right anti-detect browser.
- Ticketmaster Review 2026: Fees, Pros, Cons & Verdict - Evidence-based Ticketmaster review covering verified tickets, fees, resale, customer support, app performance, and who should actually use it in 2026.
- MaxBounty Reviews 2026: Honest Pros, Cons & User Verdict - Read real MaxBounty reviews from affiliates in 2026. We break down approval, payouts, offer quality, support, and whether MaxBounty is worth it.
Sources and further reading
- 5 Effective Ways to Do Web Scraping Without Getting Blocked - Websites are laid with anti-scraping measures ready to spot and block you. But follow these five ways and do web scraping without getting blocked.
- Open Browser - BasicsPath: /api/v1/browser/start
Method: GETDescription: To open a browser, you need to specify the profile ID. After a successful launch, you can obtain the browser's debug interface for executing Selenium a
- API Overview - AdsPower supports Local API function to help users programmatically users read and write profile configuration information, as well as creating, closing, and querying profiles and other basic API functions. You
Frequently Asked Questions
Do I need a paid AdsPower plan to use Puppeteer?
Yes. Local API access, which is required for Puppeteer integration, is available only on paid plans.
Can I use Puppeteer with AdsPower on Linux?
Yes. AdsPower supports Windows, Mac, and Linux. The Local API works the same way across platforms, though the local_api file path differs.
Does Puppeteer replace AdsPower's built-in automation?
No. AdsPower's RPA is a visual, no-code tool. Puppeteer is for developers who want full programmatic control. They serve different needs and can coexist.
Can I run multiple Puppeteer connections at once?
Yes. Launch multiple profiles through the API, then connect a separate Puppeteer instance to each. Respect the API rate limits, which vary by profile count.
What if the WebSocket address changes between runs?
The ws.puppeteer value is generated fresh on every launch. Always call /api/v1/browser/start and use the returned address rather than hardcoding it.
Conclusion
AdsPower handles identity isolation; Puppeteer handles behavior automation. Connecting them through the Local API gives you a realistic browser fingerprint and a full scripting interface in one workflow. The pattern is simple: start a profile, connect with puppeteer.connect(), automate, then stop the profile.
Start with one profile and a basic script. Once the connection is stable, scale to multiple profiles with proxies and a queue. That combination covers most multi-account, scraping, and testing needs without triggering the anti-bot systems that block plain Puppeteer.
For more automation and proxy guidance, check out our NetNut setup guide for AdsPower and the AdsPower vs Undetectable vs BitBrowser comparison.