
Ecwid Setup: A Complete Step-by-Step Store Guide
Take a Quick Look
Learn how to complete your Ecwid setup step by step: create an account, add products, connect a domain, enable payments, set shipping, and launch your store.
🔥 Limited-Time Offer! Save extra 10% off on your first monthly plan with code: Anitdetect10
Sign upEcwid Setup: A Complete Step-by-Step Store Guide
Ecwid setup is the process of turning an empty account into a working online store: creating your login, adding products, choosing where the storefront lives, configuring payments and shipping, and testing everything before you open for business. The platform is designed so that most sellers can finish the core setup in a day, but the details you handle in each step determine how smooth checkout feels for customers later.
This guide walks through the full sequence in a practical order and flags the decisions that are easy to get wrong.
What Ecwid setup actually involves
Ecwid Setup: A Complete Step-by-Step Store Guide - What Ecwid setup actually involves.
Ecwid is a hosted ecommerce platform. You create an account in the Ecwid admin, and the store can run as a standalone Instant Site, be embedded into an existing website, or appear inside social channels. Because the admin is the single control panel for all of those placements, the setup work is mostly configuration rather than coding.
The main setup stages are:
- Create your account and pick a plan.
- Add and organize products.
- Choose your web address or embed the store.
- Personalize the storefront design.
- Enter business, currency, and legal information.
- Enable payment methods.
- Configure shipping and pickup.
- Test the store end to end.
- Go live and connect analytics.
Step 1: Create your Ecwid account
Ecwid Setup: A Complete Step-by-Step Store Guide - Step 1: Create your Ecwid account.
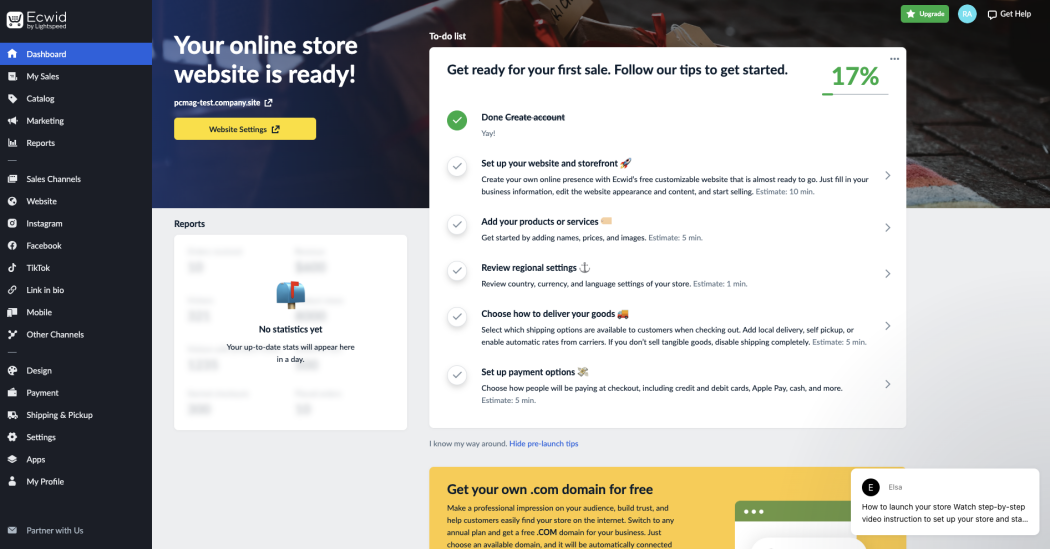
Sign-up only requires an email address, or you can register with Apple, Facebook, or Google. After entering your name, email, and password, Ecwid asks a few questions about your business and then prompts you to choose a pricing plan.
A few practical notes:
- The free plan is enough to explore the admin, but product limits and digital-goods support vary by plan, so check the current plan comparison before you commit.
- New accounts include demo products. They are placeholders, not real listings. Delete them from Catalog → Products before you upload your own catalog so you do not accidentally publish them.
- Decide early whether you will sell physical goods, digital downloads, services, or a mix. That choice affects shipping and payment configuration later.
Step 2: Add and organize products
Go to Catalog → Products and use the +Add New Product button. For each item, enter the name, SKU, description, price, and weight if it ships. Images are optional but strongly recommended; without one, Ecwid displays a gradient placeholder in product grids.
For a faster workflow:
- Use the mobile app to add products when you are photographing inventory away from your desk.
- Create categories that match how customers shop, such as by audience, season, or use case, rather than mirroring your internal warehouse layout.
- Set stock limits on items with limited quantity so the storefront reflects real availability.
- Configure applicable taxes for your jurisdiction during this stage, not after launch.
If you sell on more than one channel or run several storefronts, keep product data consistent across them. Sellers who operate multiple accounts often isolate each storefront in a separate browser profile so that sessions, cookies, and fingerprints do not overlap; tools such as AdsPower are built for that kind of multi-account separation, and the same discipline applies to keeping store admin sessions clean.
Step 3: Choose your web address
Every store on the Instant Site gets a free subdomain in the form YourStore123.company.site. You can rename the first part from Website → Domain name and site address → Change Address.
You have three realistic paths:
- Stay on the Instant Site subdomain. Fastest option, fine for testing and for very small catalogs.
- Connect a custom domain. You can buy one through the Ecwid admin or point an existing domain from a third-party registrar.
- Embed the store into a site you already run. If you already have traffic on WordPress, Wix, or another builder, embedding avoids starting from zero on a new domain. The same logic applies to selling inside Facebook or Instagram.
Pick one path before you customize design, because the design editor differs depending on whether you use the Instant Site editor or the storefront Design page.
Step 4: Personalize the storefront
On the Instant Site, design work happens in Website → Edit Site, where content blocks let you add a headline, cover image, brand story, maps, and other sections. Changes preview live in the editor.
If the store is embedded elsewhere, use the Design page in the admin instead. You can adjust the header image, logo, layout, and color treatment. Ecwid storefronts are responsive, so verify the result on a phone-sized viewport before publishing.
A simple rule: customize navigation and product grids first, then polish typography and colors. Structure problems are harder to fix after you have styled everything around them.
Step 5: Add business and legal information
In General settings and the Legal section, enter your store name, work email, physical address, currency, language, and timezone. This is not busywork:
- Your name and email appear in customer order notifications.
- Timezone affects scheduled local delivery and in-store pickup windows.
- Refund, privacy, and terms-of-service pages must be reachable before checkout so customers can review them.
Missing legal pages are one of the most common reasons a store looks unfinished to shoppers.
Step 6: Enable payments
Ecwid supports many online and offline payment methods, including Lightspeed Payments, PayPal, Stripe, and Square. Set up at least one method in the Payment section before you test checkout.
Practical guidance:
- Enable a method your target customers actually use. A card processor plus one wallet covers most cases.
- If you also accept offline payments such as bank transfer or cash on delivery, configure those too so order statuses stay accurate.
- Test a real transaction in test mode where the provider supports it, then refund it.
Step 7: Configure shipping and pickup
For physical products, decide how goods reach customers: self pickup, postal or courier delivery, or a third-party fulfillment service. Then set rates in Shipping & Pickup.
A workable sequence:
- Define your shipping strategy and zones.
- Calculate realistic rates, including packaging and handling.
- Enter the rates so customers are charged correctly based on product and destination.
- Write a shipping policy that states costs, timelines, and limitations.
If you only offer pickup, state the location and pickup window clearly, and make sure your timezone setting matches reality.
Step 8: Test before you launch
Run through the store as a customer would:
- Review the full design and navigation, checking that images and descriptions match the actual items.
- Place a few dummy orders to confirm shipping and tax calculations appear correctly and that delivery options are available in the right zones.
- Confirm you receive the transaction and order notification emails.
- Test coupons and any automated marketing emails.
- Check stock levels so nothing sells that you cannot ship.
This checklist stage catches the majority of launch-day problems.
Step 9: Go live and monitor
Once testing passes, publish the store. Your storefront is then open and customers can browse and order. After launch, connect analytics and review reports regularly so you can see which products convert and where checkout drop-off happens.
If you plan to run several stores, treat each one as a separate operational unit with its own admin session, payment account, and analytics property. Mixing sessions across storefronts is a common source of account flags, which is why multi-store operators often pair a clean browser environment with a proxy setup. For a walkthrough of that combination, see How to Use AdsPower with Proxy-Seller: Full Setup Guide.
Common Ecwid setup mistakes
| Mistake | Why it hurts | Fix |
|---|---|---|
| Leaving demo products published | Confuses customers and search engines | Delete all sample products before upload |
| Skipping legal pages | Reduces trust and can block checkout confidence | Add refund, privacy, and terms pages early |
| Wrong timezone | Breaks pickup and delivery scheduling | Set timezone in General settings |
| No payment method enabled | Checkout fails silently | Enable at least one gateway and test it |
| Shipping rates left at defaults | Overcharging or undercharging customers | Define zones and rates before launch |
| No test orders | Bugs surface in front of real buyers | Place dummy orders and refund them |
Managing multiple Ecwid storefronts safely
A single Ecwid account can host one store, so sellers with several brands or regional stores typically run separate accounts. That creates a browser-level problem: logging in and out of multiple admins on one machine mixes cookies, local storage, and device signals, which platforms can read as suspicious activity.
Anti-detect browsers solve this by giving each store its own isolated profile with a distinct fingerprint and, ideally, a dedicated proxy IP. AdsPower is one option in that category: it creates separate browser environments with unique Canvas, WebGL, and user-agent signals, supports proxy integration, and offers automation through RPA and a Local API. For teams, it also supports collaboration and cross-device synchronization. If you are comparing tools for this purpose, AdsPower vs Incogniton vs BitBrowser: 2026 Comparison breaks down the differences in fingerprints, automation, and pricing.
If your workflow includes scripted tasks such as bulk product updates, the AdsPower Selenium setup guide shows how to drive isolated profiles through the Local API.
Related reading
- AdsPower vs VMLogin vs Hidemyacc: 2026 Anti-Detect Comparison - Compare AdsPower, VMLogin, and Hidemyacc on fingerprints, automation, team features, pricing, and use cases to pick the right anti-detect browser in 2026.
- 5SIM Alternatives: 7 Best SMS Verification Services in 2026 - Compare the best 5SIM alternatives for 2026: SMS-Activate, SMS-Man, OnlineSIM, Twilio, and more, plus how to protect multi-account setups.
Sources and further reading
- Getting started with Ecwid - We are excited that you start selling online! If you want to create a stylish and professional site with an online store without spending tons of money and time on programmers and designers, you ca...
- Quick start guide - duration=09:37 cover=https://ecwidhelp.zendesk.com/hc/article_attachments/360017294900/VIDEO-COVER_Quick-start.jpg

Video duration 09:37
This video features the original version of Ecwid Instant S...
- Create an Online Store with Ecwid Ecommerce Builder - Build an online store with Ecwid Ecommerce. Ecwid has all the tools you need to launch your online store quickly and start selling online.
Frequently asked questions
How long does Ecwid setup take?
Most sellers complete the core setup in a few hours to a day. The product upload and organization stage usually takes the longest, especially for catalogs with more than a few dozen items.
Do I need a website to use Ecwid?
No. The Instant Site gives you a hosted storefront on a free subdomain. You can also embed the store into an existing website or sell through social channels instead.
Can I use my own domain with Ecwid?
Yes. You can buy a domain through the Ecwid admin or connect one you already own from a third-party registrar.
Which payment methods should I enable first?
Start with one card processor and one wallet that your customers commonly use, such as Stripe or PayPal. Add offline methods only if your business model requires them.
How do I test an Ecwid store before launch?
Place a few dummy orders, verify that shipping and tax appear correctly for each delivery zone, confirm order notification emails arrive, and check that coupons and stock limits behave as expected.
Can I run more than one Ecwid store from the same computer?
Yes, but each store needs its own account and a clean browser session. Using separate browser profiles with distinct fingerprints and proxies reduces the risk of sessions being linked.
Conclusion
Ecwid setup is less about technical difficulty and more about sequence and completeness. Create the account, clean out demo products, add your catalog, decide where the storefront lives, fill in business and legal details, enable payments, configure shipping, and test everything before you publish. Sellers who run multiple storefronts should also plan their browser and proxy setup early, so each store operates in its own clean environment from day one.